


Share


The observability of applications running in Kubernetes is a hot topic in the DevOps world. This article will show you how we tackled the problem of monitoring and observing applications in Azure’s AKS for our customers at Unique.
The three pillars
Our goal in observability is to gather as much data as we can about our systems. We build this system on top of three main topics — metrics, logs, and traces.
#1 Metrics
Metrics represent the data that we’re able to collect from our system. They give us valuable information about the state of our infrastructure, the anmount of resources we’re using, how are we utilizing them, and much more. When it comes to gathering metrics in Kubernetes environments the choice is obvious — Prometheus.
Prometheus gives us the ability to scrape metrics, query them and configure alerts. You’ll find a ton of ready-to-use exporters for various infrastructure components that you’d want to use, giving you a ton of valuable information. The basic ones — kube-state-metrics and node-exporter provide you with system-level metrics about Kubernetes resources and the nodes that you use to run your workload on.
Where Prometheus falls short
Prometheus is great and simple to use, but it comes with a baggage. It’s not able to run in an HA mode out-of-the-box. It’s also not very suitable for storing metrics long-term.
Thankfully this problem has a good solution. Thanos allows us to run Prometheus in Highly available mode and gives us virtually unlimited metric retention by introducing several components into the setup.
#2 Logs
Logs are an essential part of observability. We collect logs to get a better understanding of what’s going on in every application or system. Logs are collected from all of the pods and nodes that we use in Kubernetes.
We decided to use Grafana Loki, due to its simplicity. Together with Promtail, we are able to collect, transform, store and query the logs. Compared to the Elastic stack, Loki has many advantages. It’s lightweight, cheap, fast, and can natively run distributed environments such as Kubernetes. It may be worse at running complex queries than Elastic, but that’s not a huge issue, since we don’t do that often when querying logs.
#3 Traces
Distributed tracing gives us the ability to track the flow of the service request as they flow through a distributed system. They give valuable insights for root cause analysis when any problems occur. We chose Grafana Tempo as a storage backend for traces since it’s very easy to manage and integrates well with other solutions in the Grafana stack. Tempo is a relatively young project so you might have to make some compromises. It does not offer a search feature at the moment, although this functionality is just getting into beta. For the moment, you’ll be relying on displaying traces by their ID.
The one that ties it all together
Metrics, logs, and traces — all of them can be visualized in Grafana, the best tool you could ask for when analyzing collected observability data.
Would it work in Azure?
At the time of writing this article, all of the mentioned components support Azure, but they are at a very early stage in doing so. You’ll not find a great anmount of resources and docs about how to set everything up. Most of the articles you’ll find will be focused on other cloud vendors such as AWS or GCP. Let’s see how we deployed everything to be Azure compatible.
Tools we used
We try to follow the Infrastructure as Code principle wherever we can, Terraform and Helm everything. We used Azurerm Terraform provider to create all the necessary resources in Azure and Helmfile to deploy each of the components needed in this setup. It gave us the ability to easily replicate this setup to different environments and better keep track of any modifications that might occur in the future.
Object stores
Each of the tools we used — Thanos, Loki, Tempo needs an object store to store the collected data. We utilized Azure Storage Accounts and their storage containers for this purpose. Each of the applications gets its own StorageAccount and StorageContainer. Creating them in Terraform is very simple, we just need to add two resources. We can also put the access key needed for Thanos to connect to Azure Storageaccount into Keyvault. That way we can easily access it from Helmfile when deploying the components to Kubernetes.
Azure resources required for Thanos:
resource "azurerm_storage_account" "thanos" {
  count = var.thanos_resources_enabled ? 1 : 0
  name                     = "${local.label_project}${local.label_environment}thanos"
  location                 = var.azure_location
  account_tier             = var.thanos_azure_storage_account_tier
  resource_group_name      = var.azure_resource_group_name
  account_replication_type = var.thanos_azure_storage_account_replication_type

  lifecycle {
    prevent_destroy = true
  }

  tags = var.azure_tags
}

resource "azurerm_storage_container" "thanos" {
  count = var.thanos_resources_enabled ? 1 : 0
  name                 = "${local.label_project}-thanos"
  storage_account_name = azurerm_storage_account.thanos[0].name

  lifecycle {
    prevent_destroy = true
  }
}

resource "azurerm_key_vault_secret" "thanos" {
  count = var.thanos_resources_enabled ? 1 : 0
  name         = "thanos-primary-access-key"
  value        = azurerm_storage_account.thanos[0].primary_access_key
  key_vault_id = azurerm_key_vault.monitoring.id
}
Then we need to do the same for Loki and Tempo.
Deployment to Kubernetes
After the object stores are created, we can deploy everything to our AKS cluster.

We use Helmfile to deploy everything. First of all Thanos. For configuring Thanos, I suggest you follow Bitnami’s readme for their Helm chart that we’re using. In the snipper below we focus on the object store configuration that is Azure specific. We need to specify what storage account and container to use along with the access key. To make things easier we load the access from Azure keyvault using a handy tool called vals.
Helmfile to deploy Thanos with Azure objstoreConfig:
repositories:
  - name: "bitnami"
    url: "https://charts.bitnami.com/bitnami"

environments:
  default:
    values:
      - thanos:
          primary_access_key: ref+azurekeyvault://

releases:
- name: "thanos"
  namespace: "monitoring"
  chart: "bitnami/thanos"
  version: "7.0.1"
  wait: false
  values:
    - objstoreConfig:
        type: AZURE
        config:
          storage_account:
          storage_account_key: {{ .Values.thanos.primary_access_key | fetchSecretValue | quote }}
          container: monitoring-thanos
Deploying Prometheus after that is straightforward. We use the Prometheus operator to make things easier for us. Bitnami’s kube-prometheus helm chart has everything you’ll need. Again we’re focusing on the Azure specific config in the snippet below. Using the Thanos section in the values, the operator adds a Thanos sidecar to every Prometheus replica. It uses the same storage account as the Thanos deployment above for storing the metric data. Thanos sidecar uploads the data to the object store, which are then later accessed by Thanos store from the other deployment. This way we can set the retention on Prometheus to as low as 4 hours and we’ll still be able to access the historic data. I won’t go into much detail on how Thanos works and is configured, but you can take a look at this article to get a more in-depth description of how things work.
Helmfile for deploying Prometheus:
environments:
  default:
    values:
      - thanos:
          primary_access_key: ref+azurekeyvault://
---
repositories:
  - name: "bitnami"
    url: "https://charts.bitnami.com/bitnami"

releases:
- name: "prometheus"
  chart: bitnami/kube-prometheus
  version: "6.2.2"
  namespace: monitoring
  wait: true
  timeout: 1800
  atomic: true
  values:
     - prometheus:
        podAntiAffinityPreset: hard
        persistence:
          enabled: true
          size: 100Gi
        replicaCount: 2
        podDisruptionBudget:
          enabled: true
          minAvailable: 1
        externalLabels:
          kubernetes_cluster: kube-
        retention: 24h
        disableCompaction: true
        thanos:
          create: true
          extraArgs:
            - "--objstore.config={type: AZURE, config: {storage_account: , storage_account_key: {{ .Values.thanos.primary_access_key | fetchSecretValue }}, container: monitoring-thanos}}"
Loki and Tempo
Deploying Loki and Tempo is similar. You won’t find many resources on how to do it in Azure though. They both require the same resources as Thanos, which we created through Terraform before. We’re utilizing the loki-distributed chart which deploys Loki in a microservices mode. You can use the monolith Loki deployment with the same config as well.
The important part is to define the storage and schema config. The same storageaccount can be used for chunk and index storage. We can use boltdb with shared azure store. You just need to define the config as shown below.
Helmfile for deploying Loki:
repositories:
  - name: "grafana"
    url: "https://grafana.github.io/helm-charts"
  - name: "bitnami"
    url: https://charts.bitnami.com/bitnami

environments:
  default:
    values:
      - grafana:
          loki_primary_access_key: ref+azurekeyvault://

releases:
- name: loki
  chart: grafana/loki-distributed
  namespace: monitoring
  version: 0.38.1
  values:
  - gateway:
      ingress:
        enabled: true
    ingester:
      persistence:
        enabled: true
        size: 100Gi
    querier:
      persistence:
        enabled: true
        size: 100Gi
    tableManager:
      enabled: false
    compactor:
      enabled: true
      persistence:
        enabled: true
        size: 50Gi
    loki:
      config: |
        auth_enabled: false
        server:
          http_listen_port: 3100
        distributor:
          ring:
            kvstore:
              store: memberlist
        memberlist:
          join_members:
            - loki-loki-distributed-memberlist
        ingester:
          lifecycler:
            ring:
              kvstore:
                store: memberlist
              replication_factor: 1
          chunk_idle_period: 30m
          chunk_block_size: 262144
          chunk_encoding: snappy
          chunk_retain_period: 1m
          max_transfer_retries: 0
        limits_config:
          enforce_metric_name: false
          reject_old_samples: true
          reject_old_samples_max_age: 168h
          max_cache_freshness_per_query: 10m
          retention_period: 365d
        schema_config:
          configs:
            - from: 2020-12-11
              object_store: azure
              store: boltdb-shipper
              schema: v11
              index:
                prefix: loki_index_
                period: 24h
        storage_config:
          azure:
            account_key: {{ .Values.grafana.loki_primary_access_key | fetchSecretValue | quote }}
            account_name: monitoringloki
            container_name: monitoring-loki
            request_timeout: 0
          boltdb_shipper:
            active_index_directory: /var/loki/data/loki/boltdb-shipper-active
            cache_location: /var/loki/data/loki/boltdb-shipper-cache
            cache_ttl: 24h
            shared_store: azure
          filesystem:
            directory: /var/loki/data/loki/chunks
        compactor:
          shared_store: azure
Tempo is similar to Loki, we define the Azure storage account in the storage value.
Helmfile for deploying Tempo:
repositories:
  - name: "grafana"
    url: "https://grafana.github.io/helm-charts"

environments:
  default:
    values:
      - grafana:
          tempo_primary_access_key: ref+azurekeyvault:/

releases:
  - name: "tempo"
    namespace: "monitoring"
    chart: "grafana/tempo-distributed"
    version: "0.9.16"
    wait: true
    values:
    - storage:
        trace:
          backend: azure
          azure:
            container-name: monitoring-tempo
            storage-account-name: monitoringtempo
            storage-account-key: {{ .Values.grafana.tempo_primary_access_key | fetchSecretValue | quote }}
      traces:
        jaeger:
          thriftCompact: true
          thriftHttp: true
      gateway:
        enabled: true
      distributor:
        extraArgs:
          - -distributor.log-received-traces=true
Shipping logs and traces
Logs and traces have to be sent to the distributor components of Loki and Tempo. For logs, we can utilize tools like Promtail, vector.dev, fluentd or fluentbit. For this project, we decided to go with Promtail. We’ve set it up to send logs from all of the Kubernetes containers and journal logs from nodes to Loki.
Dispatching traces is a task for your applications. With Tempo you’re able to send traces in Jaeger, Zipkin or OpenTelemetry protocols. Tempo is able to ingest them all.
Visualization
Grafana is the tool that ties all of this together. We use it to visualize the data that we gathered, create dashboards and run ad-hoc queries.
Grafana is deployed the same way as the other components, through Helmfile. It is recommended to deploy Grafana with a MySQL/PostgreSQL database for the backend storage. For the simplicity of this example, we’re using Kubernetes PersistantVolumes to store its data.
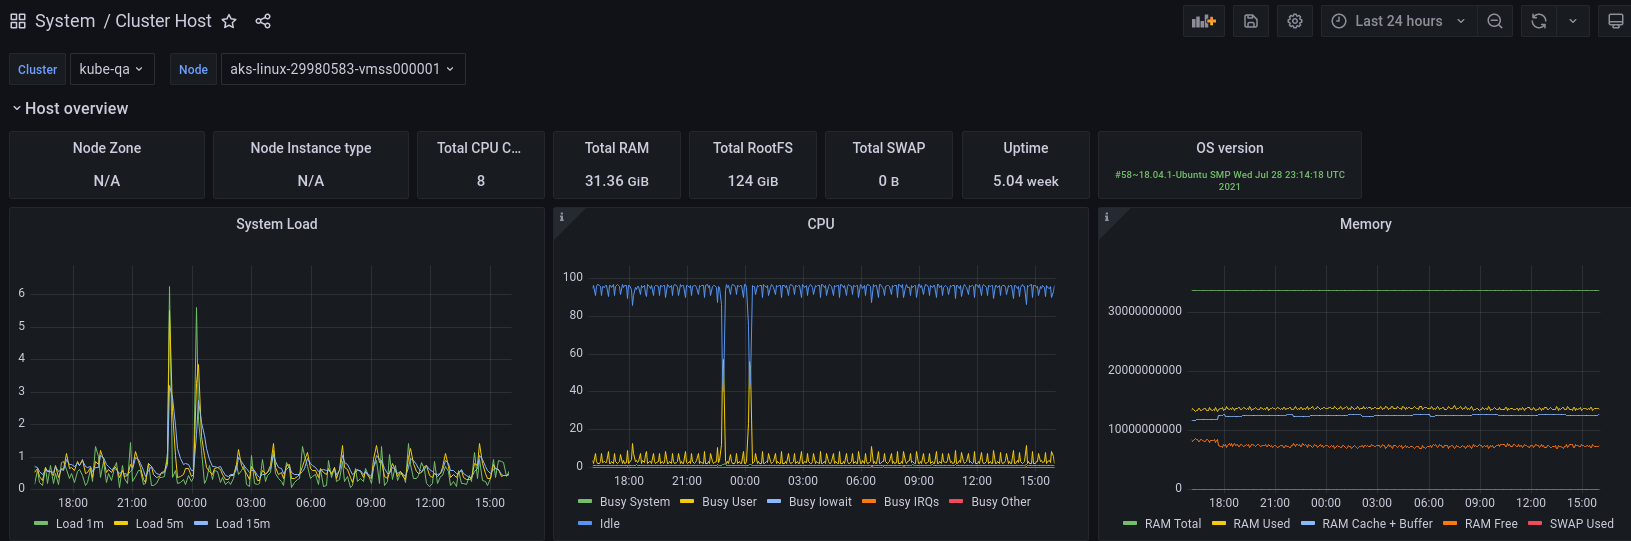
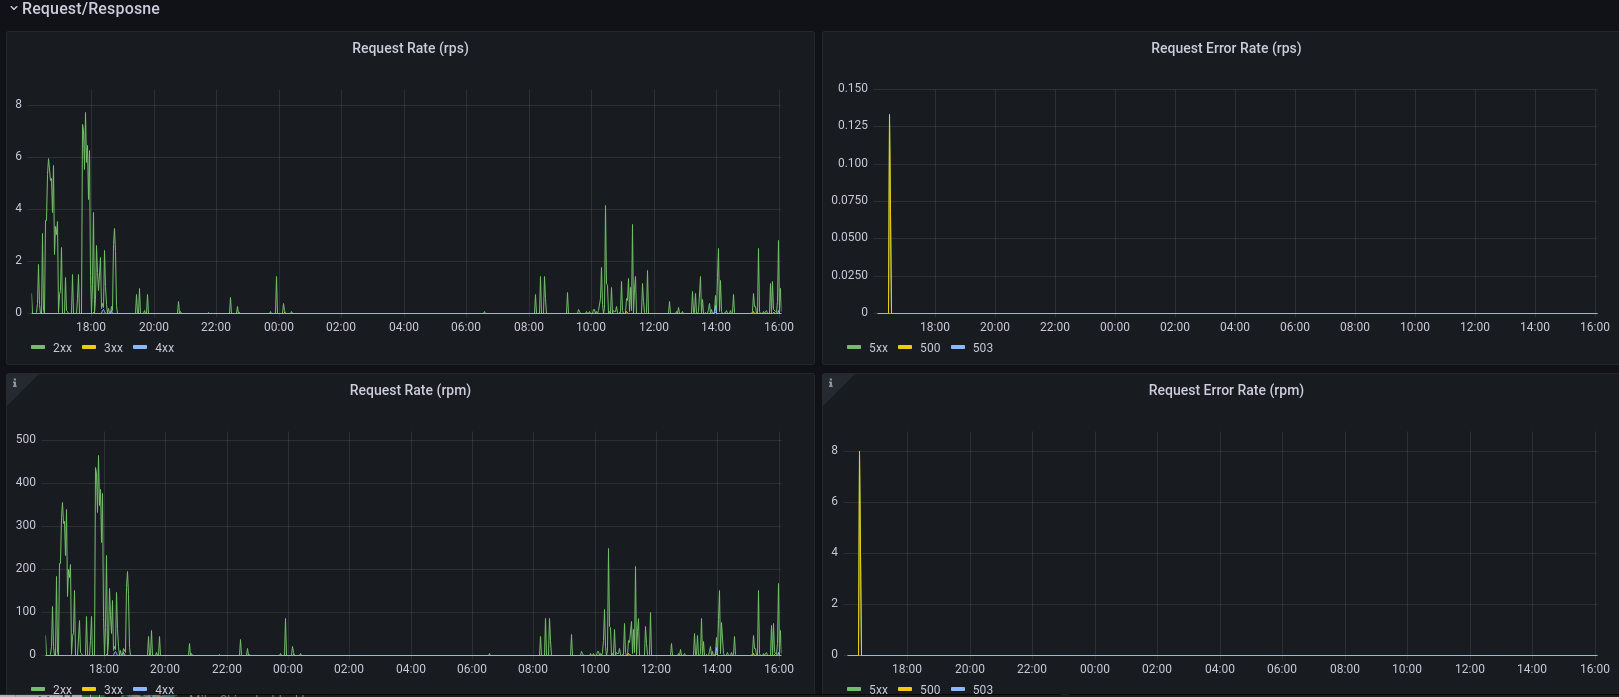
We bundle a set of system dashboards that show gather data about cluster resources such as resource (cpu/mem) utilization, network and filesystem metrics, and metrics from ingresses.
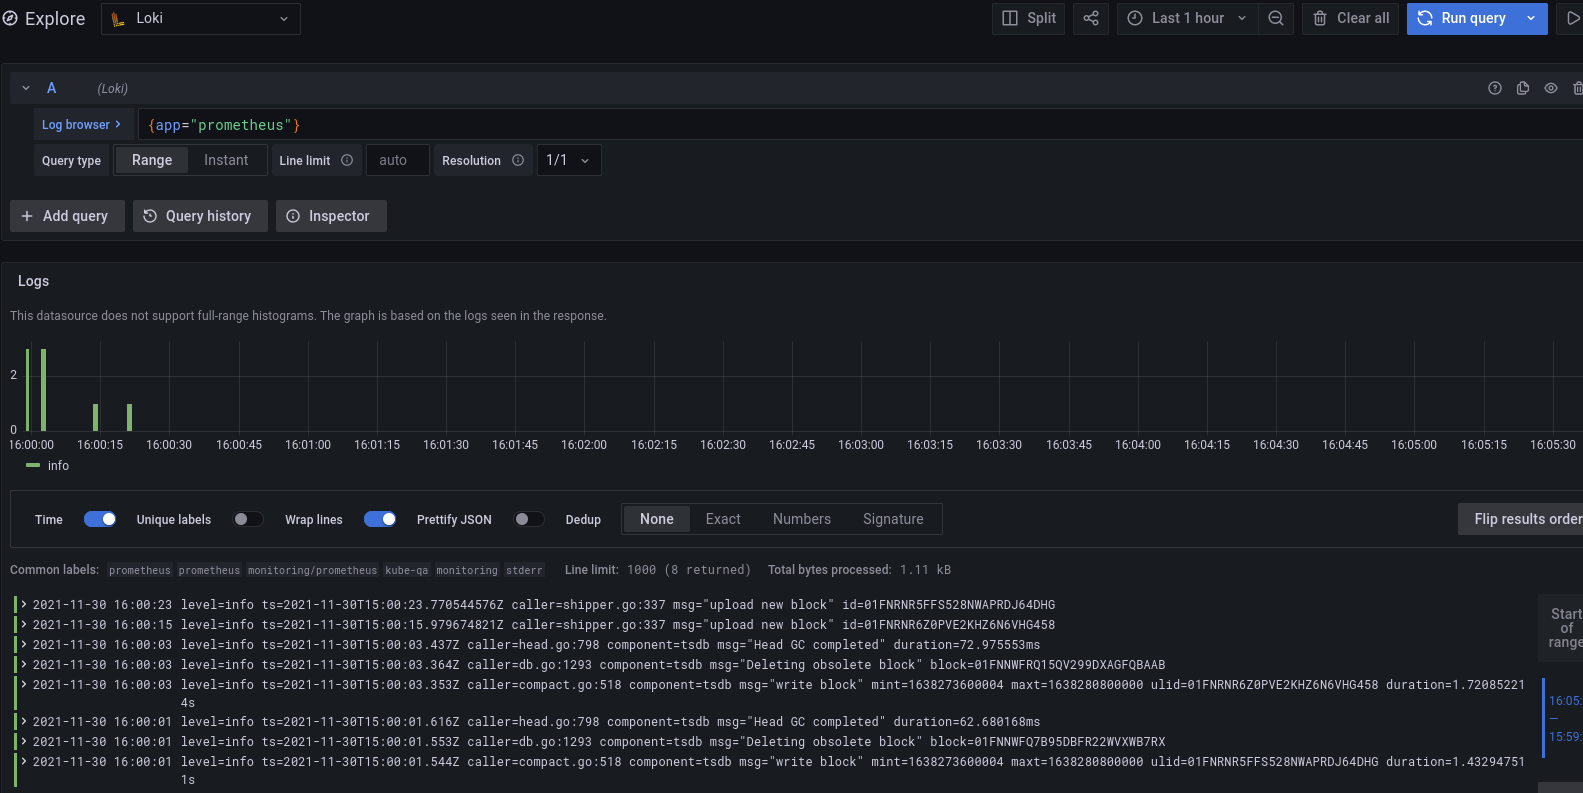
Apart from the standard visualization of data using dashboards, Grafana provides a very useful “Explore” feature, which enables you to run ad-hoc queries for all of your datasources. Using this we can easily search for logs and run Loki’s LogQL queries or display traces in Tempo.
To sum it up…
Observability and monitoring are one of the most essential, but often overlooked parts of running applications in Kubernetes. We encourage everybody to spend the required time on your monitoring stack. It will pay off the first time you’ll be solving a production outage or debugging a weird issue.
Grafana’s observability stack is a great comprehensive solution for monitoring your applications, no matter who is your cloud provider. Each component of the Grafana stack shares similar architectural model, making it easier for Day2 operations and configuration. At the first glance, it may seem not well integrated into the Azure ecosystem at the moment, but we’ve proved that it works just as well as in AWS or GCP.
–Martin Hauskrecht DevOps Engineer at Labyrinth Labs


