


Share


Why is DNS technology one of the core infrastructure components? Because almost everything uses DNS resolving! DNS works correctly most of the time and therefore we do not give it much attention.
If it stops working properly, we usually consider it the last thing where something cloud go wrong. It’s even worse to trace down DNS problems if they occur only occasionally like in our DNS issue story. One of our customers runs its infrastructure on Amazon Web Services with Kubernetes cluster installed by Kops (btw it’s a great tool to get a production-grade Kubernetes cluster up and running in public clouds).
Houston, we have a DNS problem
One of the application services has started to show a sporadic problem with readiness probes when the usage of the service was increasing. The application worked correctly but there was a problem with slightly higher latency. Application services health checks are doing functional tests, such as read/write to the AWS RDS Aurora, ElastiCache, etc., to verify connectivity and availability of external services (readiness and liveness probes deserve a separate article).
We reviewed the application logs to see why there are health checks failures and we spotted these two kinds of log messages:
cURL error 28: Resolving timed out after
getaddrinfo failed: Name or service not known
These application service logs let us know that something is happening with DNS. As you may suggest, this problem is not only related to the health checks but all the application components are affected by the DNS resolving issue. So, what now? Kubernetes, in most cases, enables an add-on called cluster proportional autoscaler for DNS. If the cluster propotional autoscaler functionality is enabled for DNS deployment, DNS will be autoscaled based on the number of nodes/pods in the cluster. We looked at various performance metrics — CPU, Memory, autoscaling activities, logs, etc. Everything looked fine, just as we expect it. We also ran synthetic performance tests against the DNS deployment to confirm that DNS pods have enough resources and behave correctly, everything looked fine during these tests. Our synthetic DNS performance tests are nothing special, it’s a docker container that sends DNS queries endlessly. It’s installed as a deployment where we can control simultaneous queries by increasing or decreasing replicas. The next step was to find a way to simulate the issue in a reproducible manner without affecting production services. We extended our tests with DNS latency and error information for each query. The extended synthetic performance test was able to simulate sporadic DNS issues we were facing. Armed with this simulation test, we can move on to see where the problem lies.
UDP Network issues
We spent a lot of time tracing DNS UDP packets in the Kubernetes network stack that was based on Calico without observable success, everything seemed to be in order. To understand the next debug flow, it is necessary to explain how Kops installs Kubernetes from the perspective of an AWS network topology. Kops supports two of predefined network topologies. We always prefer private topology where all the masters/nodes will be launched in a private subnet in a VPC with multi-availability zones to achieve high availability.
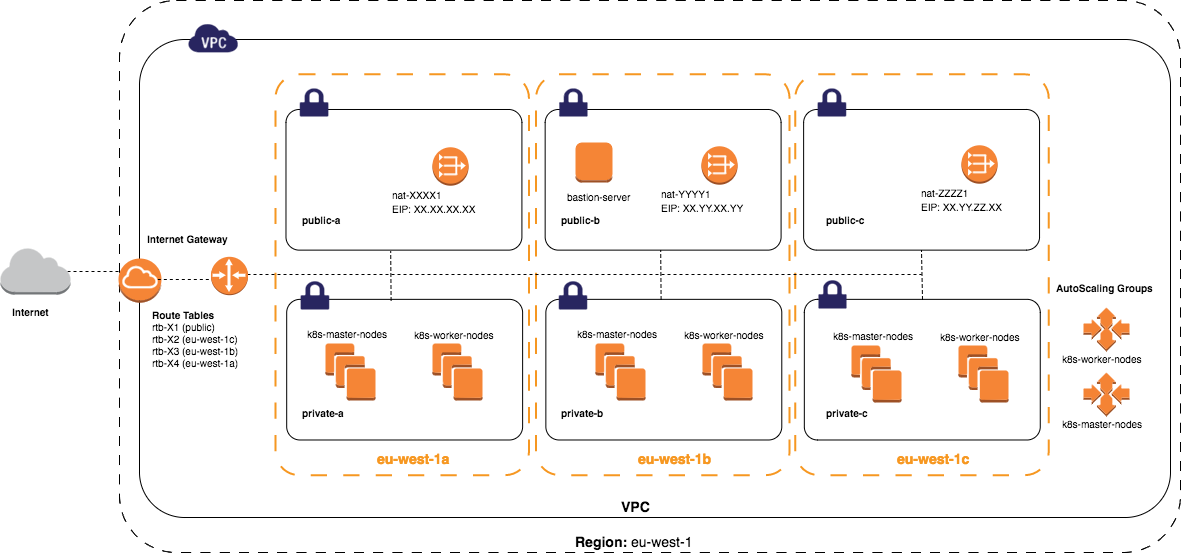
We left the Kubernetes network stack and looked at the level below, at the networking between AWS instances. We created a test environment inside the same AZs as Kubernetes was running, but all instances were out of the Kubernetes cluster to minimize side effects (in other words, Kubernetes knew nothing about test instances). Instances were dedicated only for testing purposes and nothing was running on them except test tools like iperf, tcpdump.
We tried two different test scenarios to simulate Kubernetes network architecture:
◦ Two instances within same AZ ◦ Two instances where each instance was in different AZ
Communication within the same AZ worked very well, without issues. UDP packet loss was observed only between AZs somewhere around ~0.45%. Sometimes it was worse and sometimes it was better. Packet loss has oscillation in public clouds because all resources including network are shared with other tenants (we can’t always simulate the same situation). Number 0.45% doesn’t sound so bad, right? Do you know how many DNS lookups are performed per second in your infrastructure and how many DNS packets are sent? In our case, it was ~4000 queries per second in the Kubernetes cluster for external managed services where 1 external query consists of 5 internal queries (search domains appends) which are 20 000 DNS lookups and 40 000 UDP packets per second. So, in the worst-case ~180 DNS queries per second could be lost, this is not a state you want, of course, it depends on application SLOs, but we want to do things better!
The situation may be worse and more unpredictable in Kubernetes, depending on how the DNS setup is deployed.
There are two possible deployment scenarios and we will discuss each of them from a packet loss perspective:
◦ DNS pods are behind a Service — standard and default setup in most Kubernetes clusters. In this setup, DNS queries are distributed in a round-robin fashion by the Service. Each DNS pod behind the Service should be in a different AZ to provide high availability. The probability of cross AZ communication is very high in this setup and we cannot guarantee predictable behavior of packet loss. One of the ongoing Kubernetes Enhancement Proposals is to prevent unnecessary cross AZ communication is Topology-aware service routing. It is a generic way to support topology-aware routing of services in arbitrary topological domains, e.g. node, rack, zone, region, etc. by node labels. This KEP can minimize cross AZ packet loss, but it is in an early stage and it may never be fully implemented. ◦ DNS pods are deployed as DaemonSet known as nodelocaldns setup. This addon runs a node-local-dns pod on all cluster nodes. The pod runs CoreDNS as the DNS cache. It runs with hostNetwork: true and creates a dedicated dummy interface with a link-local ip(169.254.20.10/32 by default) to listen for DNS queries. The cache instances connect to clusterDNS in case of cache misses. Having the pods query the node-local cache introduces a single point of failure. The additional tools like node problem detector, draino, and cluster autoscaler exist to help us with this kind of problem known as remedy system, but it seems to be complex setup with a lot of moving parts and we do not know how to detect node-local DNS outage correctly. There is still a single point of failure and we cannot tolerate it in infrastructure.
So what are the other options ? Back to the roots.
Resolv.conf to the rescue!
We can change the default resolving behavior via resolv.conf.
What exactly is resolv.conf?
C libraries contain DNS clients that wrap up name-to-address lookups in the DNS protocol and hand them over to proxy DNS servers to do all of the grunt work of query resolution. There are a lot of these DNS clients. The one that is in the main C runtime library (glibc) of your operating system will very likely be the one from ISC’s BIND. Although several of them contain their own native configuration mechanisms, they generally have a BIND library compatibility mode where they read resolv.conf, which is the configuration file for the ISC’s BIND C client library
When we modify something in resolv.conf, it can change the behavior of resolving on the “operating system level” (for example rust, go, python).
There are multiple options to eliminate DNS query loss:
◦ timeout:n — sets the amount of time the resolver will wait for a response from a remote name server before retrying the query (default 5s) ◦ attempts:n — sets the number of times the resolver will send a query to its name servers before giving up and returning an error to the calling application (default 2) ◦ use-vc:n — forces the use of TCP for DNS resolution (default no)
Timeout with attempts seems to be a great option to eliminate lost DNS queries but timeout value is an unsigned integer with a minimum value of 1 second, still far from the ideal solution. What about use-vc? We can use TCP as the transport layer protocol instead of UDP.
DNS TCP transport layer
Back to the school:
TCP is connection orientated protocol with build in error recovery and retransmission. To establish a connection, TCP uses a three-way handshake. For each packet sent, the TCP stack consider it successfully delivered once it gets an ACK back for that specific packet with retransmission concept called Automatic Repeat Request.
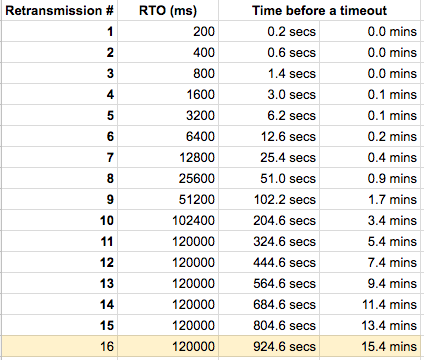
To re-transmit lost segments after establishing a connection, TCP uses retransmission timeout (RTO). When TCP sends a segment the timer starts and stops when the acknowledgment is received. If the timer expires timeout occurs and the segment is re-transmitted. RTO using an exponential back-off timeout for which each re-transmission timeout is between TCP_RTO_MIN (200ms) and TCP_RTO_MAX(120s) and up to TCP_RETR2 (15) where the values are hardcoded in the kernel:
#define TCP_TIMEOUT_INIT ((unsigned)(1*HZ))
#define TCP_RTO_MAX ((unsigned)(120*HZ))
#define TCP_RTO_MIN ((unsigned)(HZ/5))
#define TCP_RETR2 15
The TCP reliable attribute allows us to prevent DNS query loss and reduces the need for retries, all of this is directly implemented in the TCP stack. One of the drawbacks is the latency of TCP protocol. UDP is faster than TCP, and the simple reason is that its nonexistent acknowledge packet (ACK) that permits a continuous packet stream, instead of TCP that acknowledges a set of packets, calculated by using the TCP window size and round-trip time (RTT). In our use-case, it is more important reliability than latency.
We created another round of tests where we tested TCP latency and re-transmission rate:
◦ Two instances within same AZ ◦ Two instances, each instance in a different AZ ◦ Pod to pod on different instances within the same AZ ◦ Pod to pod on different instances, each instance in a different AZ
All tests passed successfully without any latency/re-transmission problems. We prepared the last test which was focused on overall DNS performance verification.
In Kubernetes you can set custom DNS options in multiple ways:
◦ Pod DNS policy ◦ Pod DNS config ◦ Kubelet resolv-conf configuration ◦ Pod entrypoint/command script — create a script with the following content:
#!/bin/bash
set -ex

export DNS_TCP=${DNS_TCP:-false}

if [ "$DNS_TCP" == true ]; then
# enable tcp DNS resloving
if [ $(grep -w options /etc/resolv.conf | wc -l) -eq 0 ]
then
echo "options use-vc" >> /etc/resolv.conf
else
mapfile </etc/resolv.conf resolv && sed -r 's/(options.*)/\1 use-vc/g; s/^\s+//g' <<<"${resolv[*]}" > /etc/resolv.conf
fi
fistart.sh hosted with ❤ by GitHub
We are using the entrypoint/command script because it has an advantage over others — there is no need to know anything about the current DNS setup (DNS service IP, host resolv.conf, etc.). DNS over TCP can be enabled or disabled using environment variable DNS_TCP per container in a pod.
Once again, we ran our synthetic DNS performance tests with DNS_TCP enabled. The results were much better than DNS over UDP but we still saw very high random latencies, some DNS lookups took more than 6 seconds to complete. Hmmm, this is bad!
To recap what we have found so far:
◦ DNS pod performance metrics (CPU, Mem), autoscaling activities, logs, … everything looked fine ◦ We switched DNS from UDP to TCP ◦ The raw TCP performance test was pretty stable without latency issues ◦ DNS over TCP had a random high latency in Kubernetes
Did we forget something important? Why some of the DNS lookups took more than 6 seconds, even while DNS lookups were the same? First, let’s see how DNS is configured in Kubernetes.
Kubernetes DNS
DNS is a built-in Kubernetes service launched automatically (depends on the Kubernetes installation method). As of Kubernetes v1.12, CoreDNS is the recommended DNS Server. The CoreDNS Deployment is exposed as a Kubernetes Service with a static IP. This is how the default CoreDNS configuration looks like created by Kops:
apiVersion: v1
kind: ConfigMap
metadata:
name: coredns
namespace: kube-system
labels:
addonmanager.kubernetes.io/mode: EnsureExists
data:
Corefile: |
.:53 {
errors
health
kubernetes cluster.local in-addr.arpa ip6.arpa {
pods insecure
upstream
fallthrough in-addr.arpa ip6.arpa
}
prometheus :9153
forward . /etc/resolv.conf
loop
cache 30
loadbalance
reload
}coredns-configmap.yaml hosted with ❤ by GitHub
CoreDNS by default enables forward plugin and cache plugin with maximum TTL to 30 seconds. Queries for domains rooted in the configured cluster domain suffix (any address ending in “.cluster.local”) will be answered by the kubernetes plugin. All other queries will be forwarded to an upstream nameserver inherited from the node (which is configured in resolv.conf) and answered by the forward plugin. What exactly is the upstream DNS server?
AWS VPC DNS
In our case resolv.conf contains the following configuration:
domain eu-west-1.compute.internal
search eu-west-1.compute.internal
nameserver 172.X.X.2
The 172.X.X.2 is AWS provided a DNS server for VPC, it can be enabled or disabled by enableDnsSupportoption in the VPC creation process, by default DNS is enabled.
Everything in AWS has its limits and AWS VPC DNS is not an exception:
Each Amazon EC2 instance limits the number of packets that can be sent to the Amazon-provided DNS server to a maximum of 1024 packets per second per network interface. This limit cannot be increased. The number of DNS queries per second supported by the Amazon-provided DNS server varies by the type of query, the size of response, and the protocol in use.
All previous DNS tests were using DNS lookups for AWS managed services endpoints like ElastiCache or Aurora and all queries were forwarded to the Amazon-provided DNS server on IP 172.X.X.2. We thought we were sending a lot of forwarded requests to the AWS DNS server and we hit the DNS limits. So, we set up debug logging in CoreDNS deployment and run tests again to collect more information.
Results show the following conclusions:
◦ We saw a strong correlation between client high random latencies and forwarded requests to the AWS VPC DNS at the same time ◦ Not all forwarded requests had high latencies ◦ Number of forwarded requests was way lower than client lookups ◦ DNS cache seemed to work as expected
AWS VPC DNS bottleneck
You can clearly see that there is something wrong with the DNS. But what exactly? Did we hit the DNS limits or what? We did one more test to make clear what exactly happened. The test was performed using an instance in a new isolated VPC. The instance was sending one DNS lookup over UDP and TCP each second. Guess what? Some DNS lookups took more than 6 seconds to complete. We finally found out where the problem was.
There are multiple ways of how we can mitigate the bottleneck:
- Increase cache efficiency to minimize forwarded requests by increasing TTL
- Use cache prefetching
- Do not use default Amazon-provided DNS server for VPC
- Try to contact support ? (this will not help, trust me)
Before we can apply the mitigations mentioned above, we must understand the concept of endpoints in Amazon managed services. Most of the managed service endpoints are represented as DNS resource records pointing to the right IP address.
For example, Aurora managed service looks likes this:
my-aurora.cluster-X.Y.rds.amazonaws.com. 5 IN CNAME my-aurora-node-1.X.Y.rds.amazonaws.com.
my-aurora-node-1.X.Y.rds.amazonaws.com. 5 IN A 172.X.X.175aws-rds-lookup.txt hosted with ❤ by GitHub
Amazon generates service endpoint after service creation and we cannot modify its whole name, we can modify only service prefix (“my-aurora”). What we want to point out using this example is the fixed and predefined TTL time in managed services. It makes sense that we cannot modify TTL because managed services usually got auto-failover setup and Amazon is responsible for TTLs. Why does it matter? Because we cannot increase cache efficiency by modifying TTL to keep the record longer in the cache. So, we cannot accomplish the first mitigation point.
Fixed TTL creates a problem in the second mitigation point as well. Do you remember that some DNS requests take more than 6 seconds when using AWS VPC DNS? The cache expires after 5 seconds because of the fixed TTL and prefetch cannot fill the cache in time resulting in forwarded requests being fired against an upstream DNS server. It is not a disaster because the probability that this situation will occur is rare. The prefetch mitigation seems to be a sufficient solution. But of course, we can make it even better!
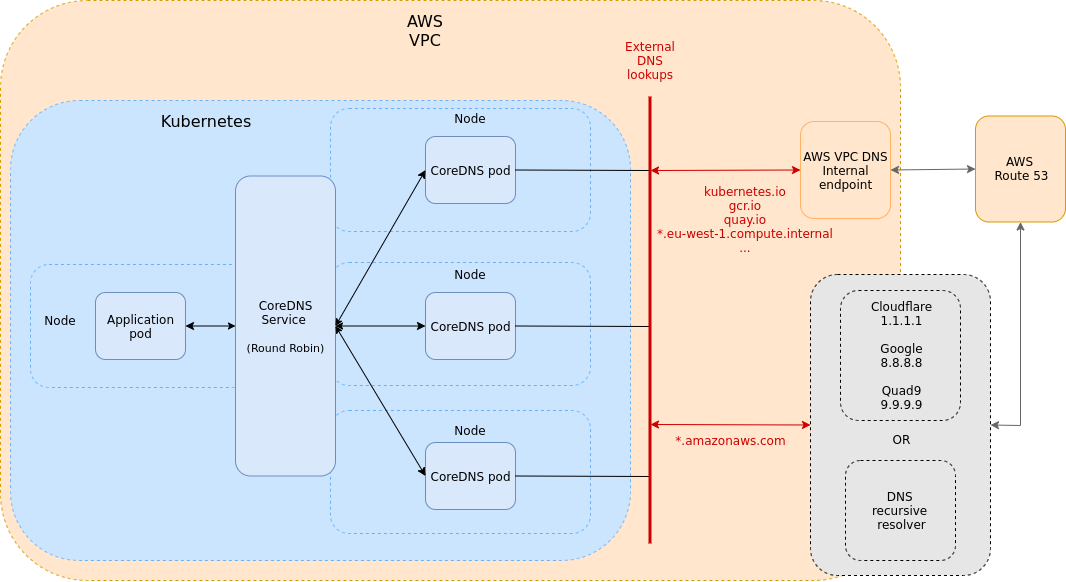
We can take an “advantage” of the default public DNS endpoints visibility (if you are not using private hosted zones in Route 53). Managed services in Amazon create public DNS endpoints by default, so they are resolvable from the internet. We can create our own upstream recursive DNS resolver to replace flaky AWS VPC DNS or we can temporarily use public DNS resolvers like google, cloudflare, quad9. We chose public DNS resolvers for testing purposes, the production environment should use your DNS recursive resolvers.
Updated CoreDNS setup
So, we have a concept that we need to somehow transform into CoreDNS config:
apiVersion: v1
kind: ConfigMap
metadata:
name: coredns
namespace: kube-system
data:
Corefile: |-
.:53 {
errors
health
loadbalance round_robin
prometheus 0.0.0.0:9153
loop
kubernetes cluster.local in-addr.arpa ip6.arpa {
pods insecure
upstream /etc/resolv.conf
fallthrough in-addr.arpa ip6.arpa
}
forward . /etc/resolv.conf {
force_tcp
max_fails 0
}
cache 3600 {
success 19968
prefetch 1 10m 80%
}
}
amazonaws.com.:53 {
errors
loadbalance round_robin
prometheus 0.0.0.0:9153
loop
forward . 1.1.1.1 8.8.8.8 9.9.9.9 {
force_tcp
}
cache 3600 {
success 19968
prefetch 1 10m 80%
}
}coredns-configmap-updated.yaml hosted with ❤ by GitHub
So, we have a concept that we need to somehow transform into CoreDNS config:
We added a new server config block to the CoreDNS config map. Each server block starts with the zones Server should be authoritative for. When DNS lookup arrives at the CoreDNS and matches domain pattern*.amazonaws.com, further processing will follow configuration in the block:◦ Forward all request to the public DNS resolvers (1.1.1.1, 8.8.8.8, 9.9.9.9) in round-robin fashion with TCP as transport layer ◦ Use aggressive prefetch of items when they are about to be expunged from the cache. Each query that has been seen with no gaps of 10 minutes or more in between will be prefetched. Prefetching will happen when the TTL drops below 80%.
DNS lookups that do not match *.amazonaws.com go to the config block with Kubernetes plugin enabled. You can add as much interested domain suffixes to the new server config block as you need. We recommend adding all those records that have low TTL and are publicly reachable. Domains that are only available internally (private hosted zones, compute.internal, …) should be served by the amazon AWS VPC DNS. We also slightly updated the original configuration by adding the prefetch option with the TCP transport parameter to improve reliability and performance.
DNS ndots and search
The last thing that deserves attention is the default resolv.conf in pods.
Search parameter and ndots:n option can negatively affect lookup performance:
search — Most resolver queries will be attempted using each component of the search path in turn until a match is found. Note that this process may be slow and will generate a lot of network traffic if the servers for the listed domains are not local, and that queries will time out if no server is available for one of the domains. ◦ ndots:n — sets a threshold for the number of dots which must appear in a name given to res_query (see resolver(3)) before an initial absolute query will be made. The default for n is 1, meaning that if there are any dots in a name, the name will be tried first as an absolute name before any search list elements are appended to it.
In our case the default resolv.conf in pod looks like this:
nameserver 100.64.0.10
search test.svc.cluster.local svc.cluster.local cluster.local eu-west-1.compute.internal
options ndots:5resolv.conf hosted with ❤ by GitHub
If we want to get the IP address for domain my-aurora.cluster-X.Y.rds.amazonaws.com, the lookup process on the client-side (pod) will append each component of the search parameter, because there are 4 dots (4 < ndots:5).
So the client will generate the following DNS queries:
- my-aurora.cluster-X.Y.rds.amazonaws.com.test.svc.cluster.local
- my-aurora.cluster-X.Y.rds.amazonaws.com.svc.cluster.local
- my-aurora.cluster-X.Y.rds.amazonaws.com.cluster.local
- my-aurora.cluster-X.Y.rds.amazonaws.com.eu-west-1.compute.internal
- my-aurora.cluster-X.Y.rds.amazonaws.com.
Queries ending with *.cluster.local are handled by kubernetes plugin where negative lookups are fast. Queries ending with *.eu-west-1.compute.internal are forwarded to the AWS VPC DNS which can slow down the whole lookup process as we mentioned before. The last request is an FQDN request handled by public DNS resolvers or by custom resolvers in our setup. A fully qualified domain name is a name for which no local search will be executed and the name will be treated as an absolute one during the resolution. By convention, DNS software considers a name fully qualified if it ends with a full stop (whatever.com.).
The last search parameter item in resolv.conf (eu-west-1.compute.internal) is inherited from the host and it can be omitted to avoid slowdowns by:
◦ Pod DNS policy ◦ Pod DNS config ◦ Kubelet resolv-conf configuration ◦ Pod entrypoint/command script — search parameter replacement
Summary
DNS is an important part of the infrastructure and requires attention as any other component. We lost many DNS lookups before the DNS optimizations and this situation caused side effects like higher application latency and response times, unstable application behavior and random Kubernetes readiness probe failures. After the optimizations and fixes that were presented were applied, we didn’t notice any further problems. The DNS setup looks to be rock solid and ready for a much bigger load.
To avoid similar problems to those we experienced, focus on the following:
◦ monitor your DNS lookup times and DNS performance metrics ◦ beware of UDP packet loss rate and switch to DNS over TCP if necessary ◦ do not rely on default DNS provided in public clouds or test them properly, (so you know what to expect) ◦ try to use as little DNS lookups as possible in applications (connection pooling, etc.) ◦ review your ndot:n and search parameters in resov.conf


